Start with the video first to get a better grasp of the topic!
|
Skip Ahead to: Steps to Create an Advanced Filter |
Overview
You can use Column Filter to view specific workitems, for example, critical priority items, or Open Items. When a column is showing filtered records the column header is highlighted in bold and italics font.
To filter the list view with a combination of logical conditions, use the Advanced Filter option. For example, you may want to view Defects that have their Due Dates between a particular date range and not with ‘Low’ Priority, and so on.
Column Filters
Column Filter helps to filter the list quickly based on the existing columns.
Ensure that the List view displays the columns related to that attribute, for example, Status. It is better to select a few columns to avoid too much horizontal scrolling in List View.
Steps to Add Column Filters
- Mouse-hover on the column to be filtered.
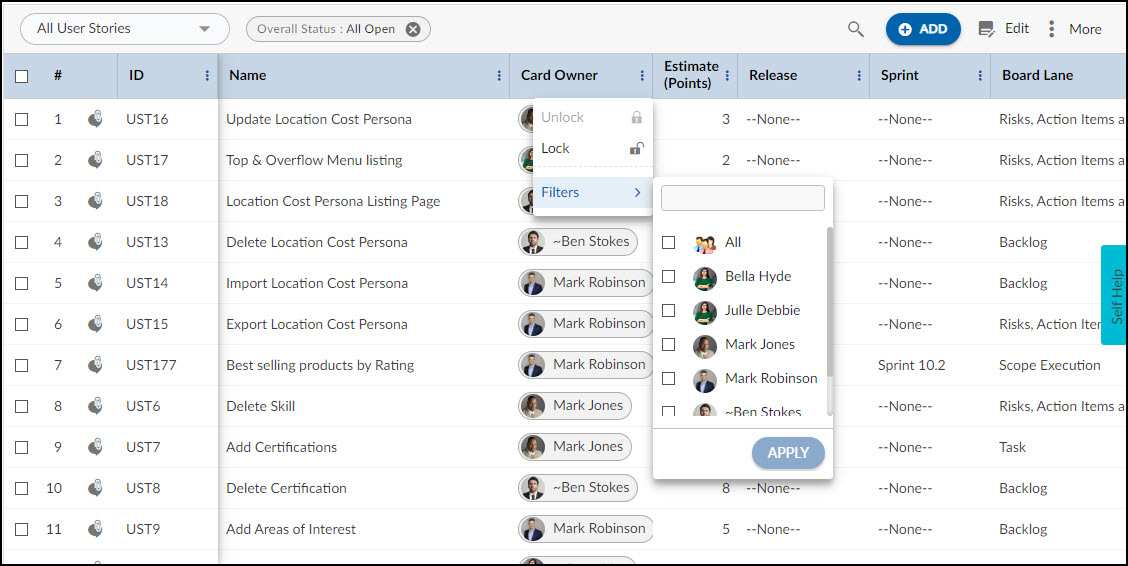
- Click the drop-down arrow and select Filters to specify the conditions for filtering. In the Filter option menu, select one or more values.
- Click APPLY. The list view now displays workitems with the selected attribute values. When a column list has been filtered the column header has a drop-down icon against it to highlight the same.
- Clicking the filter icon brings up the filter options.
Note: If there are more than 500 instances of a workitem including All and None, then the filter option provides a search box. Enter the value in the search box based on which you want to filter the list and click Apply.
To reset the filter, click the drop-down icon, select Filters, clear the selection for unwanted values, and select new values.
To remove all the applied filters and view all workitems, click the Clear All Filters icon from More Options.
Steps to Create an Advanced Filter
You can create custom List views for viewing specific workitem groups using the Advanced Filter option. Create a filter where you can set a combination of filter criteria and then apply them. Next time, you can select this existing Filter and apply it to the list.
To create an Advanced Filter,
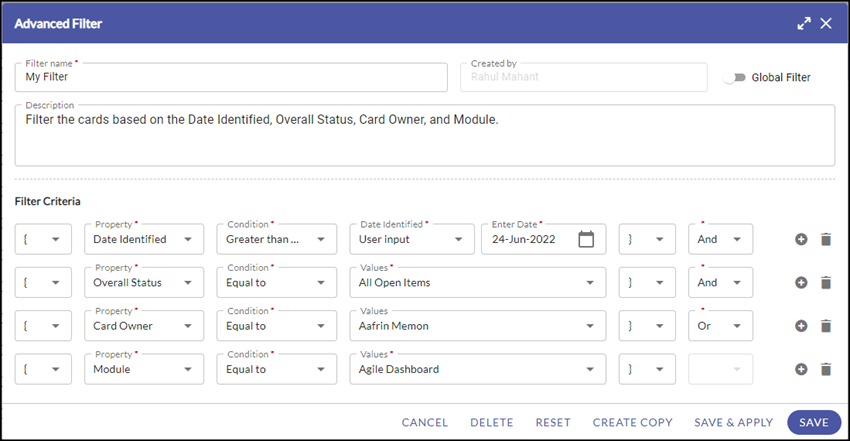
- From the workitem listing. select the CREATE FILTER button.
- Enter a Filter Name and Description.
- To set the Filter criteria, define criteria in the row by selecting Form fields, conditions, and field values in the lists. This should be enclosed within a bracket.
- To define multiple conditions, click the Add icon and select the logical operator– AND/OR. In the new row, define the nested criteria.
- As you click the Save & Apply button, the filter name appears on the toolbar before the filter icon.
- To delete a condition, click the Delete icon.
Clicking the filter box shows the applied filter criteria.
For example, to view items in a specific release and Critical priority:
-
Select ‘{‘ in the Open Bracket list column.
-
In the Property list, select Release.
-
In the Condition list, select ‘Equal to’.
-
In the Available Values list, click and select the value, for example, Release 1.0.
-
Select blank (for specific search using the AND operator) in the Closed Bracket list. Use single or multiple open and closed brackets to define an expression, as required to set a precedence within.
-
Click the Add icon.
-
In the Operator list, select AND.
-
In the new row added, define the new expression, as explained in the above steps. Select blank in the Open Bracket list, Priority as Critical, and a single Closing bracket. To remove an expression, click the Delete icon for the required expression.
-
Click SAVE or SAVE & APPLY. Click Save As and enter a new name to clone an existing Pre-defined Filter.
Note:
- The operator precedence will be taken into account if you specify nested brackets. For example, you can specify the criteria as ((1 or 2) and 3).
- If you add more rows in the editor and delete rows later, there will be additional brackets displayed in the pattern. For example, if there are 5 rows added and if you delete the 4th row, the expression will read as ( ( ( ( 1 and 2 ) or 3) )or 4 ), hence select the open and close brackets again to match.
Clearing Advanced Filter
You can also close the applied advanced filter by clicking the icon in the filter name box.
Note:
- By default, all the workitems having the Overall status field as Open is displayed.
- In case the listing does not have an Overall status column in the Table view, then all the workitems get displayed.
- In case a column-level filter is applied after applying an advanced filter, then all the workitems as per the column-level filter are displayed.
Editing Filter Criteria
To edit predefined Advanced filter criteria,
- Go to the workitem listing drop-down and click on it.
- Hover on the created filter and click the Edit icon.
- Make the necessary changes and click the SAVE button.
Note:
- Only the user who has created the advanced filter has the right to edit his/her created advanced filter. No other user can edit an Advanced Filter created by others. However, using the Create Copy option, you can save the existing filter with a different name and use it.
- In the Pre-Defined Filter list, if any value in the list is displayed in red, it indicates that the filter is created using a custom field that is deleted. The search result will display the item even if the Search String is entered in a mixed-case format.
Define Global Filters for Custom List Views
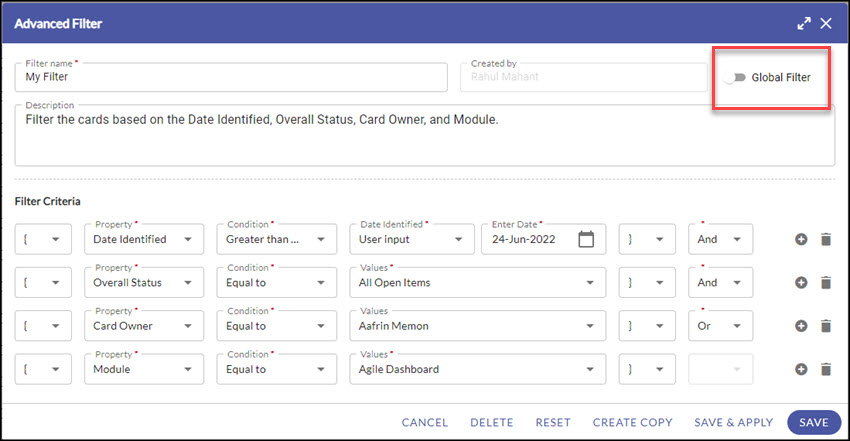
You can share the filter you created for others to use.
In the Advanced Filter window, select the Global Filter option for the Advanced Filter you create or have already created. Other users will be able to view the filter in the Pre-defined Filter list for this List view.
Clear All Filters
To clear the filters and see all the workitems, go to More Options on the workitems listing page. Click the Clear All Filters icon.


