Start with the video first to get a better grasp of the topic!
|
Skip Ahead to: |
Overview
Task Plan is used to manage simple tasks in a simplified version without a ToDo or other section compared to any other form.
Note: The menu name will be Tasks or Task Plans depending on the “number of task plans allowed” project preference selection. Learn more here.
Navigation
Expand the Recent Projects menu in the left navigation panel and select any project. Hover over the Project breadcrumb at the top, expand the Execute module, and select Task Plan/Task.
Steps to Add Task Plans
Note: The ADD button will be disabled if a single task plan is selected in the project preferences. Learn more here.
To add a Task Plan:
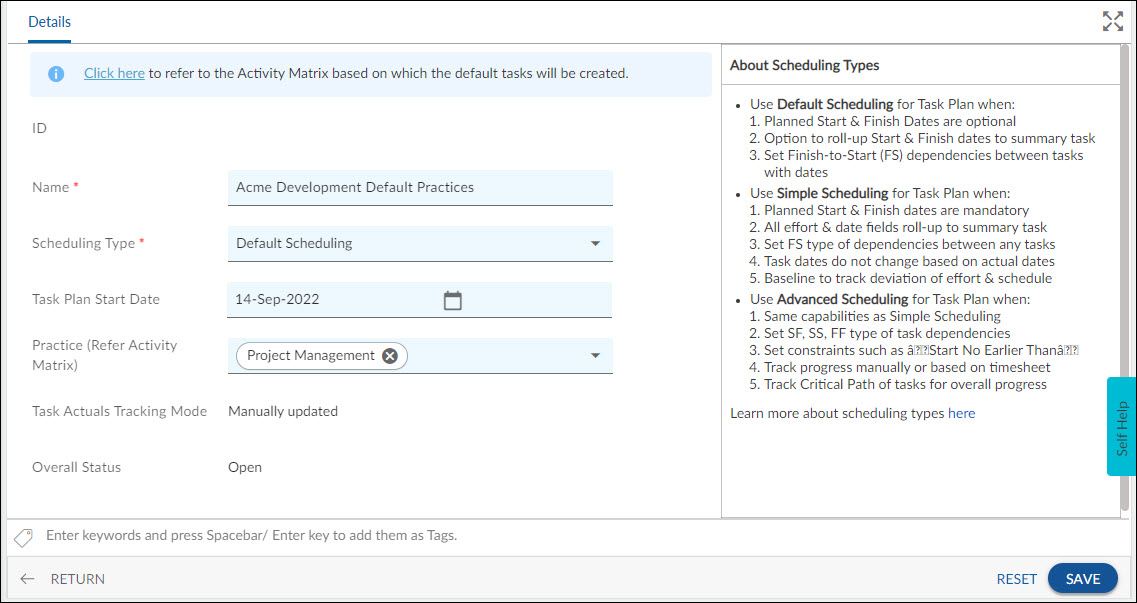
- Click on the ADD button.
- Enter a Name.
- Enter the start date in the Task Plan Start Date field.
- The Task Plan Start Date is default set to the Task Plan creation date.
- If the Task Plan Start Date is left blank, the task dates in the Tasks section will default to the Project Start Date.
- Select the Scheduling Type as Default Scheduling, Simple Scheduling, Advanced Scheduling, or Microsoft Project Client. By default, the Simple Scheduling option will be selected.
Note:
a. You will see only the Advanced Scheduling option if the Advanced Scheduling license is enabled.
b. Scheduling types are based on the selected template. For example, the Simple Project Management template includes only the Simple Scheduling Type and a Microsoft Project Client. - Select the Task Actuals Tracking Mode as Manual or Based on timesheet data. You can only select the Manual option from the Task Actuals Tracking Mode drop-down if the Advanced Scheduling option is selected in the Scheduling Type field. If the Simple Scheduling/MSP option is selected in the Task Module field, then the Task Actuals Tracking Mode automatically shows the Based on Timesheet data option. If the Default Scheduling option is selected, then the Task Actuals Tracking Mode automatically shows the Manually updated option.
- Click the Save button.
Note: To enable or disable fields in the Details section or any section/tab of a Task Plan, click here.
Once the Task Plan is created, then the following tabs are visible:
- Details: The Details section displays, gathers, and tracks all information related to the Task.
- Comments & Attachments: The members can add comments related to the project item which are then listed in the Comments section. When a project item requires more data for reference, you can attach files that can be downloaded, edited, and uploaded. For more information, click here.
- Activity Log: The Activity log displays the list of operations in reverse chronological order for activities performed such as updating, closing, reopening, etc. In the Activity Log, you can view the various versions and the differences between the two versions of a workitem. For more information, click here.
- Tasks: The Tasks tab shows the list of tasks available in the Task Plan. You can add, modify or delete these tasks, assign resources and log time against them, and can do much more.
- System Fields: All the system-generated fields or uneditable fields are listed in the System Fields segment. Also, you can easily track the Task Plan’s progress with these important fields in the System Fields section. The fields include Planned Start/Finish Dates, Actual Start/Finish Dates, Planned/Actual Effort (Hrs.), Baseline Dates, Baseline Effort (Hrs.), and Work Complete (%).
Generating Tasks by Activity Matrix in Task Plan
When creating a Task Plan, you can choose to automatically create tasks based on the practices listed in the Activity Matrix. Your organization may have defined practices and activities/tasks created, or you can define an Activity Matrix for your project if it is not based on a Process Template. For projects based on process templates, the Activity Matrix may already be defined, or you can create your activities in the Activity Matrix.
To generate tasks based on the Activity Matrix, you can instantiate one or more practices. This will automatically generate tasks in the Tasks List view based on the Activity Matrix. Once the tasks are generated, you can schedule them by adding Planned Start and End Dates and allocating Resources.
To generate tasks by instantiating practices at the time of Task Plan creation, follow these steps:
- Perform Steps 1-5 as outlined above.
- Click on the Practices tab and select one or more practices as required.
- Click on the Save button.
- Now, you can see that tasks are automatically created based on activities in the Activity Matrix in the Tasks section of the Task Plan.
To learn more about Activity Matrix, click here.
You can view the list of Task Plans that are based on Practices in the Task Plan Listing View.
Common Operations to Manage Task Plans
- Edit
- Multiline Add Item
- Delete
- Export
- Import
- Multi Sort
- Workitem Listing
- Multi Sort
- Copy
- Column Settings
Note – The number of available options depends on the scheduling type you have selected. For example, the default scheduling type might have minimum capabilities while the advanced scheduling type will have maximum scheduling capabilities.

