In this article, we will help you understand how to activate ESP, story map, risk framework, and roadmapping dashboard.
|
Skip Ahead to: |
Overview
Before you start using the ESP analytics, Story Map feature, and Risk framework in SwiftKanban, it is important to enable them in the application. Read the following sections to know how to activate them with a few easy steps.
Note: Once you assign the user license to any user, it cannot be unassigned from him or her. Once you delete this user from your account, that particular license will be available again.
Activating ESP Analytics
Once the ESP analytics has been purchased, it needs to be enabled for the required user(s) within the application.
Note: The activation can only be performed by a user with an Admin role.
To activate an ESP license, perform the following steps:
2. On the People page, double-click on the License column for the user for whom you would like to activate the ESP analytics. Note: The license can be applied to any user, but he/she needs to have the Manager role at the Board to use the ESP module. 
3. Select the ESP checkbox and click Save.
Activating Story Mapping Dashboard
To activate the Story Mapping dashboard, perform the following steps:
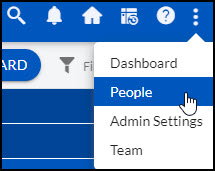
1. From the control panel, click the More Options ![]() icon > People.
icon > People.
2. On the People page, double-click on the License column for the user for whom you would like to activate the Story Mapping feature. Note: The license can be applied to any user, but he/she needs to have the Manager role at the Board to use the Story Mapping module.
3. Select the StoryMapping checkbox and click Save.
Activating Risk Framework
Once the Risk Assessment Module has been purchased, it needs to be enabled via the Risk Framework plug-in
Note:
1. The activation can only be performed by a user with an Admin role.
2. It is available only when the ESP license has been enabled.
To activate the Risk Assessment module, perform the following steps:
- From the control panel, click the More Options
 icon > Admin Settings page.
 - On the Admin Settings page, click the Plugins tile. The Plugins page is displayed.
- On the Plugins page, click Enable for the Categorical Risk Tracking plugin.

The Status will be updated as Enabled for the Categorical Risk Tracking.
Activating Roadmapping Dashboard
Once the Roadmapping dashboard has been purchased, it needs to be enabled for the required user(s) within the application.
Note: The activation can only be performed by a user with an Admin role.
To activate a Roadmapping license, perform the following steps:
2. On the People page, double-click on the License column for the user for whom you would like to activate the Roadmapping dashboard. 
3. Select the Roadmapping checkbox and click Save.

