In this article, we will help you understand how to define and manage teams.
|
Skip Ahead to: |
Overview
If you are working with large Kanban Boards involving multiple teams, you are sure to find the Defining Teams feature very useful. SwiftKanban lets you, group members in ‘Teams’ and use the ‘Team List filter on the Kanban board and Reports to track the progress of cards assigned to a specific team.
After you add users to SwiftKanban, you can group them into teams. You can include a user in multiple teams such as the Developer Team, QA Team, and so on.
One thing to note, the purpose of building a team is to create a group of people with a specific goal. So, the team represents a group of users, but it does not take any work or card in its name. The work or card always gets assigned to the user who may belong to multiple teams.
Creating a Team
To define a team at the enterprise level, perform the following steps:
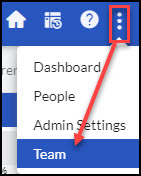
1. From the control panel, click the More Options icon > Team. The Team page is displayed.

2. On the Team page, click the Create icon from the side toolbar to create the first team in your enterprise. Enter the Team name and its description.
3. From the Kanban Development pane, click the required user to add them to the Added Members pane.

To locate the user, you can perform any of the following steps:
a. Scroll the list
b. You can also filter the list based on First Name, Last Name, Role, Login Id, and Email Address by clicking the filter![]() icon
icon

c. You can switch to list view, by clicking the Switch to ![]() ListView icon. You can search by typing in each field, the list box displays the matching users.
ListView icon. You can search by typing in each field, the list box displays the matching users.
4. Click the Create Team button in the right corner. The team is created and listed in the Team view.
Viewing the Team List
The Team page lets you view the existing teams and also create, edit, or delete a team.
- To edit, add or remove users of a team or rename the team name, select the required team, and then click the
 Edit icon in the side toolbar. Once you are done with the changes, click the UPDATE TEAM button to save the changes.
- While updating the team, you can also filter the user list based on First Name, Last Name, Role, Login Id, and Email Address by clicking the Filter
 icon.
icon. - You can also switch to list view, by clicking the Switch to ListView
 icon. You can search by typing in each field, the list box displays the matching users.
- While updating the team, you can also filter the user list based on First Name, Last Name, Role, Login Id, and Email Address by clicking the Filter
- To view the team details, select the team and click the View
 icon. On the view mode, you can verify the members of the selected team and if required update it as mentioned in step 1.
 - To delete the team from the enterprise, select the team, and click the Delete
 icon from the side toolbar. After confirmation, the team will be deleted permanently and users tagged to the Team will no longer belong to the depleted team.
 - To filter the list of the Team based on Name, Description, and Current State, click the Filter icon from the side toolbar. You can then enter the filter text on the textbox or select the value from the Current State drop-down field to further refine your data.
Teams Available for Boards
Team Member Invite: After teams are defined in the enterprise, these can be used to filter team members based on specific teams when inviting the team members into projects. For example, in the Team List Filter select Testing and Automation. The list displays users selected from the Testing and Automation teams.
The Team Members page also displays the Team List filter box to filter the list to view team members belonging to specific teams. See the Help page on Team Setup for more details.

Board Filter: Using the filter, you can view only those cards that are assigned to the team members belonging to the teams you select in the Filter. For the team members, who belong to a team and are assigned to your Board, cards for only those teams will be displayed on the board. See Board Filter for more details.
Status Reports: In Status reports, you can view reports for the team members belonging to the teams you select in the ‘By Team List’ filter. See Reports for more details.
Enabling Team License
To activate the Team page for Manager and Member roles user, perform the following steps:
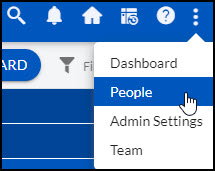
1. From the control panel, click the More Options ![]() icon > People.
icon > People.
2. On the People page, double-click on the License column for the user for whom you would like to enable the Team feature. For this, make sure you have an Admin user account. Note: The license can be applied to any user, but he/she needs to have the Manager or Member role at the Board to use the Team module.
3. Select the Team checkbox and click Save.
Now, the Manager and Member role user can access the Team feature.


