A Work-In-Progress (WIP) limit is the limit set of the number of cards that can be worked on at any one time, in any column. This allows people to focus on what’s important and not switch too much between tasks (which creates waste). WIP limits can be set by clicking on the ‘Modify Process’ link on the Kanban board.
You can define the WIP limit at the following levels:
User Level
For every user, you can set a WIP limit by using the User WIP configuration and apply that limitation across all boards for that user.
Note: During WIP calculation for the user, cards in the Done lane are excluded from the WIP count.
Additionally, you can enable the Do not consider Parent cards in User/Team Member WIP calculations policy under WIP Limit Policies. When this policy is enabled, Parent cards assigned to the selected user are excluded from their WIP count, ensuring only Child cards are considered on the Board.
Example:
Let’s consider a board named Login and Setup Page wherein the user Brenda McGuire has 3 in-progress cards on the Board which includes one parent card EPIC20.
Likewise, she has 3 in-progress cards in another Board Axis Capital Development which includes one parent card EPIC3.
So, a total of 6 cards are there across Boards on Brenda’s name which includes 2 parent cards.
Now, when you enable the Do not consider Parent cards in User/Team Member WIP calculations policy.
To do this:
- Navigate to Board Settings.
- Select the Board Policies tile.
- Go to the WIP Limit Policies section and enable the policy.
Upon enabling the policy, the User WIP for Brenda McGuire changes from 6 to 4 which excludes the 2 parent card’s count.
Why?
Brenda McGuire is the owner of the two parent cards EPIC20 in Login and Setup Page Board and EPIC3 in Axis Capital Development Board. As this policy excludes parent cards from the User WIP count, both EPIC20 and EPIC3 are no longer included in Brenda’s WIP calculation. Thus, the User WIP count of Brenda now becomes 4.
Lane Level
You can set a WIP limit for a lane or column based on card count or estimate points. You can define the WIP limit for either All or In Progress lanes on your board. Moreover, you can specify both the maximum and minimum WIP limit of a lane or column.
For example, you can define User WIP for Card Count in In-Progress lanes based on which you can set the maximum number of cards that can be assigned to a user in the In-Progress lanes.
Enabling WIP Limit Feature
While defining the WIP limit for a user, you can further define the limit for individual users and individual active boards. Irrespective of whether you choose user-level WIP or board-level WIP, you need to begin by enabling the WIP feature.
To enable the WIP feature, first select the relevant Admin Policy.
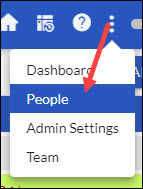
Click the More Options icon > Admin Settings to access the Admin Policies. On the Admin Settings page, click the Admin Policies tile. Then, the policies will be listed.
Enable the User WIP limit Settings feature by selecting the Unit of Measurement (UoM) for tracking the User WIP limit.

You can configure the User WIP limit based on the:
-
- Units of Measurement (UoM) like Card Count, Actual Effort(In Days), Estimate(days), and others will be used for calculating the aggregated WIP of a user.
- Column Type: Cards either In-progress column type or all column types across the Swim Lanes of the active Boards will be considered for WIP calculation.
- In the case of card count, the number of unique cards, currently in the In-Progress or all column types of the active Boards will be considered for the WIP limit calculation.
- In the case of other units like Actual Effort or Estimate, the aggregated value entered for those fields in the cards on the In-Progress or all column types of the active Boards will be considered for the WIP limit calculation.
3. Select the lane, where the selected User WIP is applicable (the changes are saved automatically).
Defining WIP for each User at the Admin Level
To define WIP for each user, perform the following steps on the People page.
To access the People page, click the More Options icon > People menu from the control panel. The People page is displayed.
On the People page, under the WIP Value column, double-click the desired username and enter the WIP limit for the respective user.
The WIP Status column indicates whether the WIP is Active or Inactive for the respective user. Under this column, double-click the desired username to alter the WIP status as per requirement.
Click the filter icon on the side toolbar to search for a specific user based on the different columns.
Defining User WIP for each Board
You can also define a user WIP limit for every active board. To set a board-specific WIP limit, from the Board name, go to the Team Member page. On this page, you can define the WIP value for each board member.
WIP Limit Violation Notification
Once the WIP Limit is defined for users, open the desired board.
- The user’s profile picture is encircled with red ink on the card if the User WIP limit or Lane WIP limit is violated.

Click User WIP on the Side toolbar to see the WIP details of each user assigned to the current board.
A pop-up appears that displays the total number of cards assigned to each user across all active boards along with the WIP limit. You can sort the user WIP list on any of the following attributes:
-
-
- Card Count (default)
- Name
- WIP Violation
-
Following is the color code for notification of User WIP violation:
-
-
- Red: The number of assigned cards has exceeded the user WIP limit for the current active board
- Orange: The number of assigned cards has exceeded the user WIP limit for another active board
- Green: The number of assigned cards is within the WIP limit of the user
-
Pop-up displays the details of only those users for whom WIP is defined in the current active board.
Click Personal Kanban View to see the lane-wise breakup of assigned cards, and click any cell in the table to get further drill-down data on the card’s current lane and its title.
Team Member Filter
Easily filter out WIP details of each user assigned to the current Board. It retrieves the WIP limit for a specific team member, improving accessibility and efficiency in monitoring work in progress.
You can further sort this in ascending or descending order by selecting the ASC or DESC option.
If creating a card violates the user’s WIP, a warning message is displayed. For instance, in the following example, user WIP for the board has been set to 1. Creating another card gives the following notification on top of the Kanban board.
Defining Column/Lane WIP Limit
Tips: We have an exciting in-app Learning Enabler, called Challenges that would help you learn and apply the WIP interactively. Please navigate to Help & Support > Challenges from the top level menu and try out the Challenges.
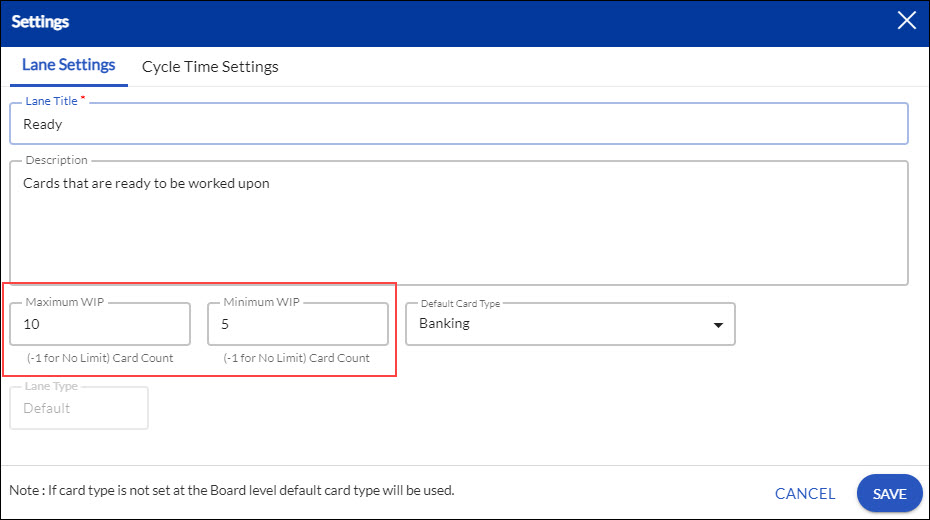
You can define minimum as well as maximum WIP limit of cards in card count or estimate points for a particular column of an active Board. To set the limit:
-
-
- You can set the Minimum and Maximum WIP limit. Depending on the Minimum and Maximum WIP limit that you have entered, the WIP limit will be highlighted.
- Click the column header for the column in which you want to set the limit.
- Click the Board Editor icon.
- Go to the Kanban board.
- When you are not meeting the Minimum WIP limit, then the color will turn to Orange.

- The same is applicable for the Maximum WIP limit. If you exceed the Maximum limit, then the color will change to Red.
-
Note: (If you set the limit as -1 then there is no limit set for that particular column)
Enter the Minimum as well as Maximum WIP limit, and click Save. After you start adding the card in that particular column, you will get to see the WIP status as Maximum WIP/Current WIP/ Minimum WIP.


