You can use SwiftKanban to create new card, map relationship hierarchy among new and existing cards in a Microsoft® Excel file, and import that file into SwiftKanban. This import feature significantly reduces time and effort when you plan for a mass update or data transfer between SwiftKanban and third-party tools like Atlassian® JIRA.
Following are the key advantages of this feature:
- Add and link multiple cards (work-items) simultaneously ensuring time save.
- Seamless data migration from a third-party tool such as Jira into SwiftKanban.
Let us assume you want to perform any of these tasks:
- Create a new parent card and link that card to a new or existing child card across multiple boards.
- Create a new child card and link that card to a new or existing parent card across multiple boards.
- Link an existing child card to a new or existing parent card.
Note 1: No card can be added to the closed Board via the Excel import.
Note 2: To link a new child card with a new parent card, you must first create the new parent card. To know how to create a new parent card, refer to scenario 1.
To achieve any of these goals, we can use a simple Excel sheet with a predefined template. This predefined template has card attributes and hierarchy-specific columns. To know how to download that template, see the Importing Microsoft® Excel into SwiftKanban section.
Let us understand few scenarios for adding cards and mapping relationships among the cards using the following table:

Scenario 1: Creating new parent card (Refer row 1 from the table)
Perform the following steps to create a new parent card:
1. In the ParentCardId column, enter the id for a new parent card, such as <NewParent1>. The parent card id can be alphanumeric and further used for linking a child card.
2. In the ParentProjectId column, enter the actual board id to which the card belongs.
Note: Ensure that you have appropriate rights to create a card in the corresponding board.
3. In the CardType column, enter the card type for the new parent card such as <Defect>.
Note: Ensure that the card type you are using is defined in the corresponding board. For more details, refer to Defining Card Types.
4. In the Title column, enter the title of the card such as <New Parent Card>.
5. Enter the additional and non-mandatory details such as Priority, Current Column, Due Date, Estimate, and so on.
Note: You can also add these details once the card is created on the Kanban board.
For more details on the field format, refer the Important Things to Remember section.
Scenario 2: Creating a new child card and linking with new parent card (Refer row 2 from the table)
Perform the following steps to create a new child card and linking with new parent card:
1. In the ParentCardId column, enter the id for the parent card. This must be the new parent card id, considering scenario 1 you can use <NewParent1>.
2. In the ParentProjectId column, enter the actual board id to which the child card belongs.
3. In the ChildCardId column, enter the id for a new child card, such as <NewChild1>. This can be any value, which is further linked to the parent card.
4. In the ChildProjectId column, enter the actual board Id to which the card belongs.
5. In the ChildIsNew Column, enter Y.
6. In the CardType column, enter the card type for the new child card, such as <UserStory>.
Note: Before you perform step no. 6, make sure you have completed the following pre-requisites:
- The card type you are using is defined in the corresponding board.
- You have a pre-defined relationship hierarchy between the selected card types.
Example: Card type <Defect> and <UserStory> must have an established relationship, only then you can create a link between NewChild1 and New Parent1. For more details, refer Defining Card Hierarchy
7. In the Title column, enter title of the card such as <New Child Card>.
8. Enter the additional and non-mandatory details such as Priority, Due Date, Estimate and etc.
Note: You can also add these details once the card is created on the Kanban board.
For more details on the field format, refer the Important Things to Remember section.
Scenario 3: Creating a new child card and linking with existing parent card (Refer row 3 from the table)
Perform the following steps to create a new child card and linking with existing parent card:
1. In the ParentCardId, enter the existing parent card id such as <ExistingParent1> with card type as <Defect>.
Note: The card must already exist in the board.
2. In the ParentProjectId column, enter the actual board id to which the parent card belongs.
3. In the ChildCardId column, enter the id for a new child card, such as <NewChild1>.
4. In the ChildProjectId column, enter the actual board Id to which the child card belongs.
5. In the ChildIsNew Column, enter Y.
6. In the CardType column, enter the card type for the new child card, such as <Issue>.
Note: Before you perform step no 6, ensure that you have completed the following pre-requisites:
a. The card type you are using is defined in the corresponding board.
b. You have a pre-defined relationship hierarchy between the selected card types.
Example: In this scenario, card type <Defect> and <Issue> must already have a relationship defined to create a link between <NewChild2> and <ExistingParent1>. For more details, refer Defining Card Hierarchy.
7. In the Title column, enter title of the card such as <New Child Card2>.
8. Enter the additional and non-mandatory details such as Priority, Due Date, Estimate and etc.
Note: You can also add these details once the card is created on the Kanban board.
For more details on the field format, refer the Important Things to Remember section.
Scenario 4: Linking existing child card to a new or existing parent card (Refer row 4 from the table)
Perform the following steps to link an existing child card to a new or existing parent card:
1. In the ParentCardId, enter the new parent card id such as <NewParent1>, or the existing parent card id such as <ExistingParent1>.
2. In the ParentProjectId column, enter the actual board id to which the parent card belongs.
3. In the ChildCardId column, enter the id for the existing child card, such as <ExistingChild3>.
Note: The card must already exist in the board.
4. In the ChildProjectId column, enter the actual board Id to which the child card belongs.
5. In the ChildIsNew Column, enter N.
6. Enter the additional and non-mandatory details such as Priority, Due Date, Estimate and etc.
Note: You can also add these details once the card is created on the Kanban board.
For more details on the field format, refer the Important Things to Remember section.
Important Things to Remember about the Excel Template
- LoV values for all attribute fields like Card Type, Priority, and others are now available as a drop-down value. So, you can select their values which are derived from the Master List.
- Ensure that the card type you are using while creating a card is enabled in the corresponding board. For more details on creating card type and enabling it in the Board, refer to Defining Card Types Help page.
- While creating a new child card and linking it with a new parent card, ensure that:
- The card type you are using is defined in the corresponding board.
- You have a pre-defined relationship hierarchy between the selected card types. Go to Admin > Settings> Card Type Links, and check if the card types you are linking between already have the parent-child link established.
Example: Card type <Defect> and <UserStory> must have an established relationship, only then you can create a link between NewChild1 and New Parent1.
- Add cards directly to the board using this template. Previously, you could only add them to the backlog.
- Some of the default field values will automatically be filled in if you leave them blank.
- Validation of data is performed on save and errors are thrown as a pop-up message.
- To place the new card in a particular Column, enter the Column name under the Current Column section in the Excel sheet.

- The format for defining the column for a card should be like: <Lane>:<Column>#<sub-Column>#<…>
- Do not enter the name of the lane under the Lane column or delete the column itself. It is a read-only column.
- To correctly import the dates, set the format of dates in Excel (.xls) files to Text, then enter dates in the dd-mmm-year HH:MM:SS [AM/PM] format.
- To use this template, you must first enable all macros in Microsoft Excel. To do that, go to Options > Trust Center > Trust Center Settings > Macro Settings > Select Enable all macros.
Importing Microsoft® Excel into SwiftKanban
Perform the following steps to import an Excel file:
1. Go to the All Cards list view.
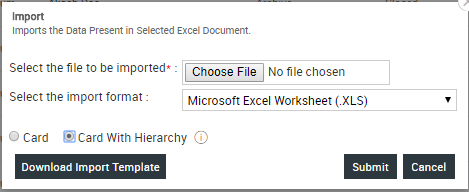
2. Click the Import ![]() icon from the side toolbar. The Import window is displayed:
icon from the side toolbar. The Import window is displayed:

3. Browse and select the required Excel file to be imported..
Note: It is recommended to download the Import template, and use it for importing the hierarchy. In case you are not using the recommended template, make sure your Excel file has at least the following column names: ParentCardId, ParentProjectId, ChildCardId, ChildProjectId, ChildIsNew, CardType, and Title.
4. Select the import format.
5. Click the Card With Hierarchy radio button.
6. Click Submit.
Exporting Card Hierarchy into Microsoft® Excel
Perform the following steps to export an Excel file:
1. Go to the All Cards list view. All card list is displayed.
Note: You can also opt for any card type like User Stories, Task, and so on to export all the cards of that card type. In such case, instead of All cards, go to the card type-specific list view.
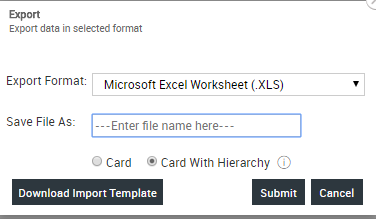
2. Click the Export ![]() icon from the side toolbar.
icon from the side toolbar.

3. Select the Export Format from the drop-down list.
4. Enter the file name under the Save File As text box.
5. Click the Card With Hierarchy radio button.
6. Click Submit.
